I Put a Bloodborne Fight in My Curse of Strahd Campaign

Don't worry, everybody survived... at least eventually.
Let me explain.
While DMing our Curse of Strahd campaign I discovered that nothing evokes real, actual horror like a fight with a boss that (1) you don't think you can escape, and (2) you're pretty sure you're unprepared for.
The party was about to face Volenta Popofsky, wife to Strahd and a remorseless sadist vampire who has been terrorizing them into terrible choices for literal, real-world years (since they were level 5). They were in a situation where they had to fight her now, and I wanted to make the encounter bone-chilling for them.
I wanted them to feel that, if they don't play at the top of their game and be careful, they would die; that, If they managed to survive, it would be by the skin of their teeth.
This was their chance to fight back the bully, the point in the story where they stop running, turn around, and say "no more". The only way to make their revenge epic was to make the fight impossibly hard.
So I got thinking: How can I make this fight seem hard, while actually giving them a fair chance?
The answer was in my hands (because I was playing with the PS4 at the time): I've never felt more epic than when I killed a boss in a From Software game. Dark Souls and Bloodborne are perfect engines of overcoming – well-oiled dopamine machines that make every boss seem unbeatable, only to give you a huge rush when you finally smash it to dust.
So... could I adapt a Bloodborne fight to my Curse of Strahd campaign?
Stay tuned to find ou– Yes. The answer is yes.
Here is how I adapted the Shadows of Yharnam fight for my 8th level party.
Two Ghosts and a Vampire walk into the ring...
I loved the Shadows of Yharnam fight from Bloodborne. If you haven't seen it, here is a (spoiler-laden) guide:
There are two main features that make this fight perfect for a Cinematic Boss Fight:
- There's three of them, which means that the players have an inherent sense of progression each time they kill one. It's not "hit them until I tell you they're bloodied", it's "hit them until you kill one, and then there are two left". The "life counter" for the entire encounter is right there, in the number of minis left.
- When one of them dies, the other two get stronger and more annoying to deal with. As it progresses, the fight seems to get harder (this is not really true because of Action Economy, but nobody is thinking that when they're being hit in the face). This is perfect setup for a climax where only one of them remains, and it has the powers of all three combined, making them incredibly scary.
To translate this into Curse of Strahd, I made Volenta fight alongside two ghosts. These ghosts take the form of Volenta, being indistinguishable from her except for their HP and ability scores.
Each "Volenta" has one special ability, loosely inspired by the Shadows of Yharnam:
- Form of Fury: Wields a giant broadsword (think Berserk or Final Fantasy VII). This is your single-target DPS, and will try to rush down a single character to death.
- Form of Flame: Wields a lantern, and mostly casts AoE fire spells to deal damage to the entire party at once.
- Form of Thunder: Wields a candle and a big mace. Can stun and knock people away, and their goal is to position people away from the Form of Flame and into the Form of Fury.
The Stat Block
Volenta has the base stat block of a Vampire. She has all the usual strengths and weaknesses like sunlight sensitivity and having to knock before coming into a room.
However, I've changed all the Actions she can take to reflect her three forms. They're not for the faint of heart
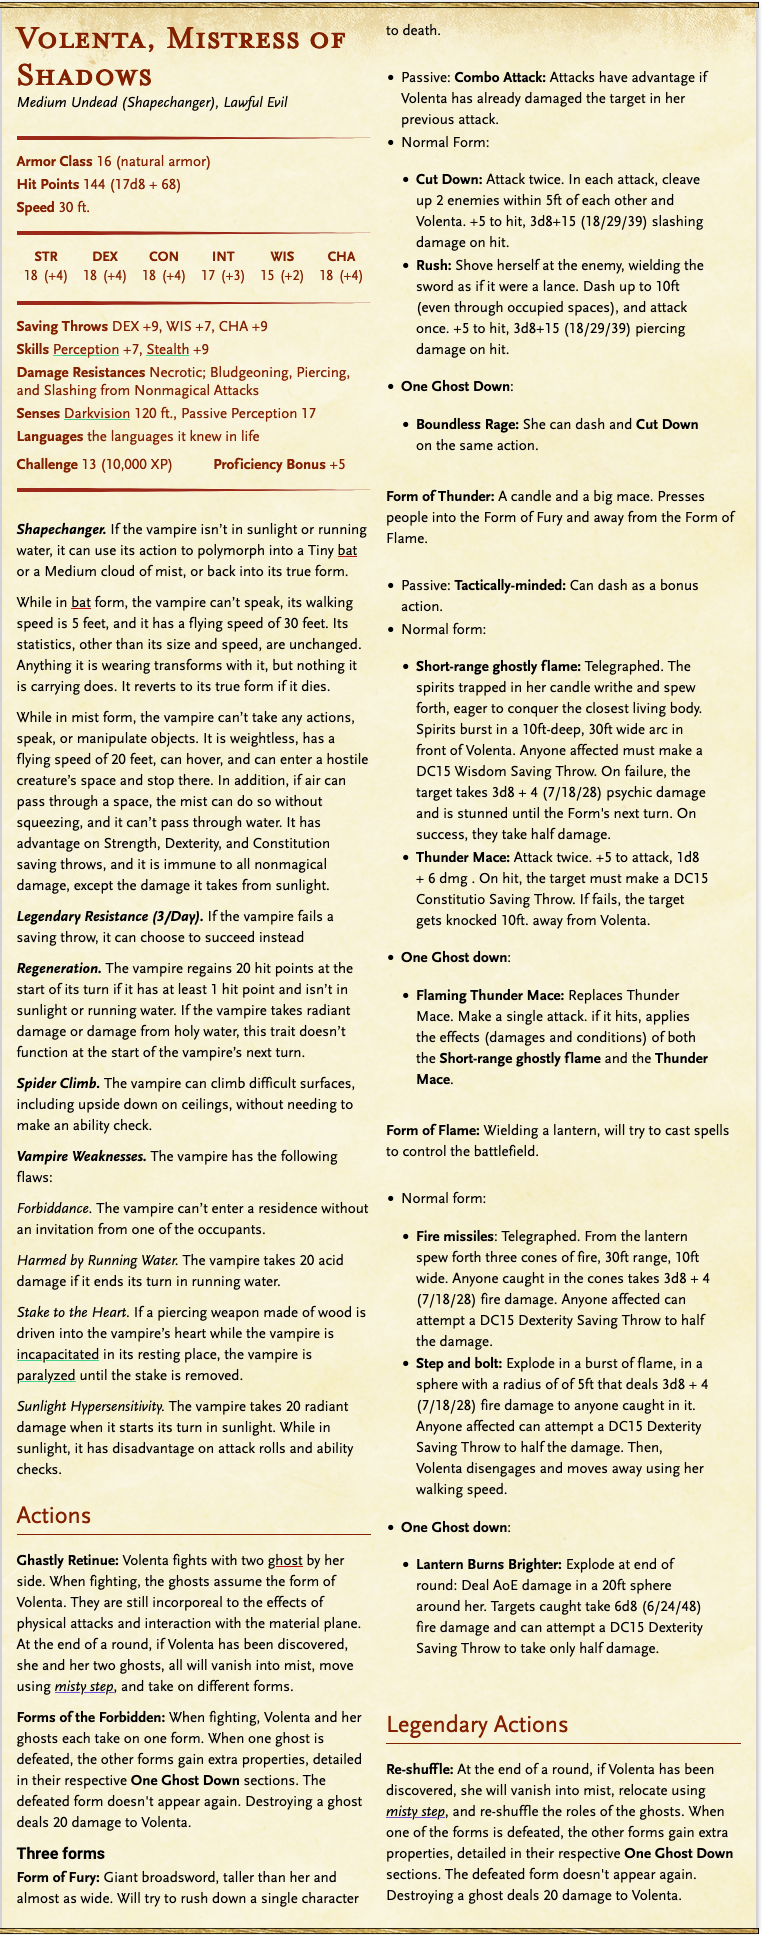
You can see the full stat block in D&D Beyond.
Let's dive into the stat block. There are a few things to note here:
- Every Form has a Passive skill. This skill is always in effect, just like Spider Climb.
- All three Forms roll initiative separately.
- Every form starts with two possible actions in their normal form (when there are three Volentas). In each of the Form's turns, you only have to pick where it's going to move, and which one of the two actions it's going to perform.
- Every Form has a "One ghost down" effect. They gain these abilities when one of the Volentas dies.
- All damage numbers have three variants (XX/YY/ZZ). These correspond to the minimum, average, and max damage an attack makes. These will be relevant if you don't want to roll dice, or if you want to quickly check "could this attack possibly kill a PC?" That question becomes relevant really quickly.
- Some attacks are Telegraphed. This is shorthand for "your players should know this attack is coming at least one turn in advance". For instance, when the Form of Thunder was preparing to stun them, I described how "the one with the candle took a big inhale as the candle's flames grew larger, wilder, dancing in a pattern that captures your attention and doesn't let go". For really big attacks, like the Form of Flame's "Fire missiles", I actually drew on the dry-erase battlemap to mark where "the floor itself parted as flame erupted from the crevices".
Running The Encounter
At the start of the fight, choose one of them to be Volenta. The other two are ghosts. Ghosts are incorporeal, which is the main way PCs have to discover the real Volenta (e.g. by shooting an arrow and seeing that it goes through a fake Volenta). In my game, Volenta started as the Form of Fury, because she really can't resist a good bloodbath.
Volenta's Tactics
In general, you want to start by having the Form of Fury smack someone really hard. If you can get a combo onto someone, you'll accomplish that "Oh, sh$t" moment that gives you that strong start in a fight.
After that, it becomes a game of positioning. The party has to try to stay out of range of the Form of Fury, while avoiding the AoE spells of the Form of Flame.
An 8th level party has a ton of tools to reposition, so make sure you use the Form of Thunder to keep people in place so that the Form of Fury can continue smacking them.
When they kill the first Volenta, make sure you emphasize how each of the remaining ones changes to become stronger. The fangs on the Form of Fury glisten in the moonlight. The fire in the lantern of the Form of Flame breaks the glass and coils around its hand, etc.
When there is only one Volenta left (hopefully the real one), feel free to use any of the actions in any of the Forms. Volenta will fight to the bitter death, for she is bloodcrazed, and will not realize she's losing until she's physically unable to continue killing.
The Barovian Shuffle
When she is discovered, Volenta will re-shuffle. As a free action in the real Volenta's turn, she and the remaining forms can melt into shadow. They will re-form in the same positions, except Volenta might have traded places with one of the ghosts.
Music
This is the Bardic Tools blog, so it just wouldn't be right if I didn't craft a little scene to go with the fight.
Introducing: "The Vampire's Shadows", available now to all Bardic Tools users (please excuse the audio quality, I still haven't quite figured out how to record my screen correctly).
This is how I use it:
- I start the fight with the "Light Rain" and "Ghostly Realm" ambiences on low. This is where we exchange "pleasantries" (read: threats about how Volenta is going to cut them to pieces), and the "Cockroaches" track playing on low starts building that tension, while allowing space for friendly discussion.
- When we roll initiative, I change the track to "Countdown" or "Heavy Suspense". Form there, I leave "Finale, pt. 2" on repeat as a nice background epic track while I use the sound effects liberally for Volenta's spells.
- When one of the ghosts falls, I use the "Thunder" effect to emphasize that the fight is getting harder, and turn up the "Light Rain" ambiance a little.
- Finally, when the second ghost falls and Volenta is about to go ballistic, I switch the ambience to "Thunderstorm".
- The "Permafrost" track is for when they end the fight, especially if a character or an important NPC has died and they want a tragic moment to digest what the heck just happened.
The Aftermath
When we ran the fight, it ended with Volenta alone, her ghosts gone, her unlife hanging on by a thread after having dropped two of the three party members unconscious and having killed Ezmeralda D'Avenir.
Only the ranger remained, standing over the lifeless body of the bard, his recently betrothed, drawing his bow for one final stand. He drew on the power of his Arrow of Sunbeam, the last one he had and, using his inspiration, shot twice.
The table held their collective breaths as the ranger's player rolled... and got a natural 20.
Everybody looked at me as I smiled broadly, and proceeded to ask my ranger: How do you want to do this?
It was epic. One of my favourite fights of the three-year campaign.
I hope yours is epic too.
P.S.: This is totally homebrewed content, which may or may not be balanced. Our table cares much more about telling an epic story than we do about rules balance. I was very liberal when tweaking the numbers on the go to suit the emotional impact to the players. Please tweak as you go.
As Matt Colville said, encounter design doesn't end when you roll initiative.